| Atveriet Scheduler un spiediet uz Create schedules, tālāk izvēlamies One to One un spiežam Next. | | Open Scheduler and click on Create schedules, then select One to One and click Next. |
Cilnē Details sniedziet tālāk norādīto informāciju. - Schedule Name: izvēlieties noklusējuma nosaukumu, kas tiek izmantots katram izveidotajam kalendāra notikumam.
- Schedule Color: atlasiet krāsu. To izmanto, lai ieplānotos notikumus iekrāsotu jūsu personīgajā informācijas panelī. Uzaicinātie, kas apmeklēs jūsu Plānotāja lapu, redzēs arī notikuma veida krāsu.
- Schedule link: pievienojiet pielāgotu apakšdomēnu.
Piezīme. Publiskās lapas saitē ir jāsatur vismaz 3 rakstzīmes, un tajā nedrīkst būt rakstzīmes, kas nav burtciparu rakstzīmes, izņemot - un _. - Duration: izvēlieties izveidoto kalendāra notikumu noklusējuma ilgumu.
- Video Conferencing: izvēlieties, kuru pakalpojumu izmantot, veidojot kalendāra notikumu: Nav (None), Zoom sapulce (Zoom meeting) vai Tikai Zoom tālrunis (Zoom Phone Only).
Piezīme. Kad tiks izveidota Zoom sapulce, tai būs tādi paši noklusējuma iestatījumi kā lietotāja Zoom Meetings noklusējuma iestatījumiem.- (Neobligāti) Ja izvēlējāties Zoom sapulci (Zoom meeting), atzīmējiet izvēles rūtiņu Enable Zoom Meeting Waiting Room, lai iespējotu uzgaidāmās telpas funkciju. Varat iespējot vai atspējot uzgaidāmās telpas funkciju Zoom Scheduler sapulču tikšanās reizēm. Funkcija Waiting room ļauj kontrolēt, kad dalībnieks pievienojas sapulcei. Kā sapulces vadītājs varat uzņemt dalībniekus pa vienam vai turēt visus dalībniekus uzgaidāmajā telpā un uzņemt visus uzreiz.
- (Neobligāti) Location: sniedziet informāciju par šīs sapulces norises vietu, piemēram, telpu vai adresi.
- (Neobligāti) Sadaļā Private Schedule atzīmējiet izvēles rūtiņu Make this a private schedule.
Ja tas ir izvēlēts tad tikai uzaicinātie, kuriem ir šī saite, var plānot konsultāciju ar Jums. Šis grafiks nebūs redzams Jūsu publiskajā lapā. - (Neobligāti) Additional information: norādiet papildu tekstu, kas jāiekļauj kalendāra notikumā.
Tas nav obligāti, taču to var izmantot, lai sniegtu svarīgu informāciju klientiem, kuri rezervē laiku pie Jums pirms plānotā pasākuma, piemēram, pievienošanās norādījumus, atcelšanas informāciju un daudz ko citu.
Kad esat savadījuši visu informāciju spiediet Next. | | Under the Details tab, provide the following information: - Schedule Name: Choose the default name used for each created calendar event.
- Schedule Color: Select a color. This is used to color-code scheduled events on your personal dashboard. Invitees visiting your Scheduler page will also see the event type color.
- Schedule Link: Add a custom subdomain.
Note: The public page link must contain at least 3 characters and not contain non-alphanumeric characters, except for - and _. - Duration: Choose the default duration of the calendar events created.
- Video Conferencing: Choose which service to be used when creating a calendar event: None, Zoom Meeting, or Zoom Phone Only.
Note: When a Zoom Meeting appointment is created, it will have the same default settings as the user’s Zoom Meetings default settings. - (Optional) If you chose Zoom Meeting, select the Enable Zoom Meeting Waiting Room checkbox to enable the Waiting Room feature. You can enable or disable the Waiting Room feature for Zoom Scheduler meeting appointments. The Waiting Room feature allows you to control when a participant joins the meeting. As the meeting host, you can admit participants one by one, or hold all participants in the waiting room and admit them all at once.
- (Optional) Location: Provide details on where this meeting will take place, such as a room or address.
- (Optional) Under Private Schedule, select the Make this a private schedule checkbox.
When selected, only invitees who have this link can schedule with you. This schedule will not be visible on your public page. - (Optional) Additional Information: Provide additional text to be included with the calendar event.
This is optional but can be used to provide important information to clients booking time with you ahead of their scheduled event, such as joining instructions, cancellation information, and more.
When you have entered all information click on Next. |
Cilnē Availability izvēlieties, kuras nedēļas dienas padarīt pieejamas rezervācijām, kā arī katras dienas rezervācijas laika posmu. Pēc noklusējuma sestdiena un svētdiena ir atspējotas, savukārt no pirmdienas līdz piektdienai ir iespējotas un iestatītas uz 9:00 līdz 17:00. Piezīme. Katrai dienai var izveidot vairākus laika posmus, kas ļauj izveidot pārtraukumu pusdienām vai citām esošām sapulcēm. - (Neobligāti) Lai katrai rezervācijas grafika dienai lietotu iestatītās pieejamības stundas, veiciet tālāk norādītās darbības.
- Pa labi no pieejamības stundu kopas noklikšķiniet uz Apply hours to ikonas
 - Tiks parādīts darba dienu saraksts.
- Sarakstā atzīmējiet to darba dienu izvēles rūtiņas, kurās vēlaties kopēt iestatītās pieejamības stundas.
- Noklikšķiniet uz Apply. Lai atlasītu visas darba dienas un piemērotu pieejamības stundu kopu visām rezervācijas grafika dienām, noklikšķiniet uz Apply to all.
- Darba dienas tiks atjauninātas, norādot pieejamību.
- Sadaļā Exclude specific dates izvēlieties izslēgt noteiktas dienas no rezervēšanas grafika. Var izvēlēties vairākus datumus. Turklāt ierobežotos datumus var rediģēt un dzēst.
- Noklikšķiniet uz + Add a date.
- Kalendārā atlasiet vajadzīgo(-os) datumu(s). Datumi tiks parādīti sadaļā Exclude specific dates.
- (Neobligāti) Datumā, kuru vēlaties noņemt, noklikšķiniet uz pogas X.
- Sadaļā Timezone, izvēlieties, kura laika josla tiks izmantota šim rezervējamajam laika grafikam.
Jūsu profila laika josla ir izvēlēta pēc noklusējuma.
Piezīme. Veicot rezervāciju, lietotāji, kuri atrodas citā laika joslā nekā organizators, var atlasīt laika joslu, kas atbilst viņu pašreizējai ģeogrāfiskajai atrašanās vietai. - Sadaļā Repeats izvēlieties, cik nedēļām vēlaties izveidot šo rezervējamo grafiku:
- Forever: saglabājiet šo rezervējamo grafiku pieejamu bez beigu datuma.
Piezīme. Organizatori pēc vajadzības var atspējot rezervējamu grafiku, to neizdzēšot vai rediģējot. Tas var būt noderīgi, lai apturētu jūsu pieejamību, atrodoties ārpus biroja. - Date Range: izvēlieties, lai šis rezervējamais grafiks būtu pieejams un atkārtots katru nedēļu līdz iestatītajam datumam.
- Sadaļā Buffer time between schedules izvēlieties, cik daudz laika nodrošināt starp sesijām. Varat izvēlēties bufera laiku pirms un pēc sapulcēm.
Tas var būt noderīgi, lai dotu sev laiku piezīmju veikšanai vai turpmāku darbību veikšanai, pirms, iespējams, tiek ieplānota cita sesija.
| |
On the Availability tab, choose which days of the week to make available for the bookings, as well as the time frame on each day.
By default, Saturday and Sunday are disabled, while Monday through Friday are enabled and set to 9:00 AM to 5:00 PM.
Note: Multiple time frames for each day can be created, which allows you to create a break for lunch or other existing meetings. - (Optional) To apply the set hours of availability to every day of the booking schedule:
- To the right of the set of hours for availability, click the Apply hours to icon .
A list of the weekdays will appear. - In the list, select the checkboxes of the weekdays that you want to copy the set hours of availability.
- Click Apply. To select all weekdays and apply the set of hours for availability to all the days of a booking schedule, click Apply to all.
The weekdays will be updated with the set of hours for availability.
- Under Exclude specific dates, choose to exclude certain days from the booking schedule. Multiple dates can be selected. Additionally, restricted dates can be edited and deleted.
- Click + Add a date.
- Select the date(s) you want from the calendar.
The dates will appear under Exclude specific dates. - (Optional) On a date you want to remove, click the X button.
- Under Timezone, choose which timezone this bookable time schedule will use.
Your profile’s timezone is chosen by default.
Note: When booking, users, who are in a different time zone from the organizer, can select the time zone that matches their current geographic locations. - Under Repeats, choose how many weeks you want this bookable schedule to be created for:
- Forever: Keep this bookable schedule available with no end date.
Note: Organizers can disable a bookable schedule as needed, without having to delete or edit it. This can be useful for suspending your availability while out of office. - Date Range: Choose to have this bookable schedule available and repeated each week until the date set.
- Under Buffer time between schedules, choose how much time to provide between back-to-back sessions. You can choose the buffer time for before and after meetings.
This can be useful for giving yourself time to make notes or take follow-up actions, before potentially having another session scheduled.
|
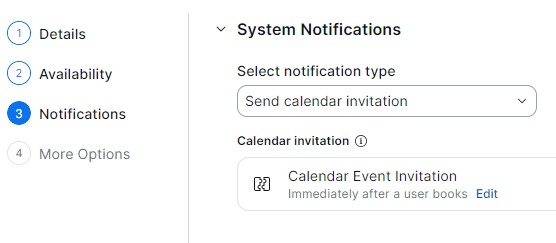
Cilnē Notifications pārvaldiet savus paziņojumus. - Sadaļā System Notifications rediģējiet sistēmas paziņojumu veidu.
- Noklikšķiniet uz nolaižamās izvēlnes Select notification type un pēc tam atlasiet kādu no tālāk norādītajām opcijām.
- Send calendar invitation: pēc grafika rezervēšanas Jūsu kalendārā tiks izveidots notikums un Jūsu uzaicinātā persona tiks pievienots kā apmeklētājs. Kad esat atlasījis šo opciju, sadaļā Calendar Invitation varat noklikšķināt uz Edit, lai rediģētu kalendāra pasākuma ielūgumu.
- Send email confirmation: pēc šīs opcijas atlasīšanas sadaļā Email Confirmation varat noklikšķināt uz Edit, lai rediģētu rezervācijas apstiprinājuma e-pastu vai atcelšanas e-pastu.
- (Neobligāti) Atzīmējiet izvēles rūtiņu Use a no-reply email address, lai paslēptu savu e-pasta adresi, liekot Zoom sūtīt e-pasta uzaicinājumus dalībniekiem, nevis no Jūsu e-pasta adreses.
| 
vai/or 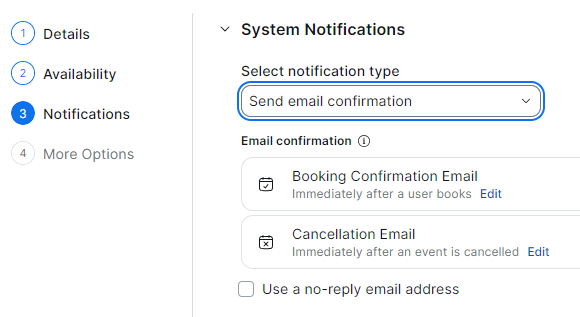
| On the Notifications tab, manage your notifications:- Under System Notifications, edit your system notification type:
- Click the Select notification type dropdown, then select from the following options:
- Send calendar invitation: After booking a schedule, an event will be created in your calendar and your invitee will be added as an attendee. After selecting this option, under Calendar Invitation, you can click Edit to edit the Calendar Event Invitation.
- Send email confirmation: After selecting this option, under Email Confirmation, you can click Edit to edit the Booking Confirmation Email or Cancellation Email.
- (Optional) Select the Use a no-reply email address checkbox to hide your email address by having Zoom send email invites to attendees rather than from your own email address.
|
Sadaļā Additional Notifications izvēlieties SMS un e-pasta paziņojumus, kurus vēlaties lietot šim rezervācijas grafikam. Noklikšķiniet uz slēdža, lai iespējotu vai atspējotu tālāk norādītos papildu paziņojumus. - Booking Confirmation SMS: nosūtīta uzreiz pēc lietotāja rezervēšanas.
- Cancellation SMS: tiek nosūtīta uzreiz pēc tam, kad lietotājs atceļ.
- Reconfirmation Email & SMS: šis e-pasts ir nosūtīts 2 dienas pirms ieplānotās konsultācijas datuma, un tas ir nosūtīts, lai atkārtoti apstiprinātu ieplānoto notikumu.
- Reminder Email & SMS: nosūtīts 1 dienu pirms ieplānotā notikuma datuma. Šis e-pasta ziņojums tiek nosūtīts, lai atgādinātu personai, kura ieplānojusi sapulci.
- Thank You Email & SMS: nosūtīts 30 minūtes pēc sapulces beigām, un šis e-pasts tiek nosūtīts, lai pateiktos personai par apmeklējumu.
- Quick Survey Email & SMS: šis e-pasta ziņojums ir nosūtīts 1 stundu pēc sapulces beigām, lai dalībnieks(-i), kurš(-i) plānojis pasākumu, atbildētu uz aptauju.
- Follow Up Email & SMS: nosūtīts 1 dienu pēc sapulces beigām. Šis e-pasta ziņojums tiek nosūtīts, lai sazinātos ar personu, kas ieplānojusi sapulci.
- Additional Resources Email & SMS: šis e-pasts tiek nosūtīts tūlīt pēc sapulces beigām, lai kopīgotu papildu resursus ar dalībnieku(-iem).
- Visi pielāgotie e-pasta paziņojumi tiks parādīti saraksta apakšā.
| | - Under Additional Notifications, choose the SMS and email notifications you want to apply to this booking schedule. Click the toggle to enable or disable the following additional notifications:
- Booking Confirmation SMS: Sent immediately after a user books.
- Cancellation SMS: Sent immediately after a user cancels.
- Reconfirmation Email & SMS: Sent 2 days before the scheduled date, this email is sent to reconfirm a scheduled event.
- Reminder Email & SMS: Sent 1 day before the scheduled date, this email is sent to remind the person who scheduled the event.
- Thank You Email & SMS: Sent 30 minutes after the event ends, this email is sent to thank the person for attending.
- Quick Survey Email & SMS: Sent 1 hour after the event ends, this email is sent to have the participant(s) who scheduled the event to respond to a survey.
- Follow Up Email & SMS: Sent 1 day after the event ends, this email is sent to follow up with the person who scheduled the event.
- Additional Resources Email & SMS: Sent immediately after the event ends, this email is sent to share additional resources with the participant(s).
- Any custom email notifications will be displayed at the bottom of the list.
|
(Neobligāti) Sadaļā Cancellation Policy izmantojiet šo neobligāto iestatījumu, lai savai sapulcei pievienotu atcelšanas politiku. Ievadītais teksts tiks parādīts e-pasta paziņojumā, kas nosūtīts jūsu uzaicinātajam. (Neobligāti) Atzīmējiet izvēles rūtiņu Include cancel and reschedule links in notifications. | | (Optional) Under Cancellation Policy, use this optional setting to add a cancellation policy for your event. The text entered will appear in the email notification sent to your invitee. (Optional) Select the Include cancel and reschedule links in notifications checkbox. |
Cilnē More Options izvēlieties kādu no tālāk norādītajām papildu konfigurācijas opcijām. - Show schedules in increments of: Izvēlieties, cik bieži tiek ģenerēti laika intervāli noteiktā laika diapazonā. Laika nišas pārklājas viena ar otru, līdz tiek rezervēta sesija, un pēc tam konfliktējošie laika sprīdi tiks noņemti.
- Maximum schedules per day for attendees: izvēlieties, lai ierobežotu dienā atļauto sesiju skaitu.
- Set minimum time before a schedule starts that attendees can book: izvēlieties minimālo laiku pirms rezervējamā grafika sākuma, ko dalībnieki var rezervēt. Ievadiet numuru un pēc tam nolaižamajā izvēlnē atlasiet dienas, stundas vai minūtes.
- Set maximum advance time for attendees to book: atlasiet laiku, ko var rezervēt iepriekš. Ievadiet dienu skaitu un pēc tam nolaižamajā izvēlnē atlasiet dienas vai darba dienas, lai iestatītu dienu skaitu, ko var rezervēt pirms laika.
- Require verification code to book: atzīmējiet šo izvēles rūtiņu, lai lietotājiem, kuri rezervē tikšanos, būtu jāievada verifikācijas kods, kas nosūtīts uz sapulces ieplānošanai izmantoto e-pasta adresi.
| | - On the More Options tab, choose from the following additional configuration options:
- Show schedules in increments of: Choose how frequent time slots in a given time range are generated. Time slots will overlap each other until a session is booked, then conflicting time slots will be removed.
- Maximum schedules per day for attendees: Choose to limit how many sessions are allowed per day.
- Set minimum time before a schedule starts that attendees can book: Choose the minimum time before a bookable schedule starts that attendees can book. Enter the number, then select days,hours, or minutes from the dropdown menu.
- Set maximum advance time for attendees to book: Select the amount of time that can be booked ahead of time. Enter the number of days, then select days or weekdays from the dropdown menu to set the number of days that can be booked ahead of time.
- Require verification code to book: Select this checkbox to require users booking an appointment to enter a verification code sent to the email address used to schedule the meeting.
|
Attendee Questions: izveidojiet pielāgotus laukus jautājumu un atbilžu formātā. Varat iespējot vai atspējot lauku, iestatīt lauku kā Required (Obligāts), izvēlēties rādīt lauku plānošanas lapā un izvēlēties Answer Format un dzēst vai pievienot citus laukus. | | Attendee Questions: Create custom fields in Q&A format. You can enable or disable the field, set the field as Required, choose to show the field on the scheduling page, and choose the Answer Format, and delete or add more fields. |
- Confirmation Page: pielāgojiet rezervācijas grafika apstiprinājuma lapu. Varat arī pievienot URL savā apstiprinājuma lapā, lai novirzītu apmeklētājus uz citu vietni ar papildu informāciju.
- Upon Confirmation: noklikšķiniet uz nolaižamās izvēlnes un atlasiet, vai vēlaties rādīt Zoom plānotāja apstiprinājuma lapu vai novirzīt uz ārēju vietni dalībniekiem.
- (Neobligāti) Noklikšķiniet uz pogas Display button text to schedule another event, lai ieplānotu citu notikumu. Pēc tam ievadiet pogas tekstu.
| | - Confirmation Page: Customize your booking schedule confirmation page. You can also add a URL on your confirmation page to redirect attendees to another website with additional information.
- Upon Confirmation: Click the dropdown and select if you want to Display Zoom Scheduler confirmation page or Redirect to external site for attendees.
- (Optional) Click the Display button text to schedule another event checkbox. Then, enter the Button text.
|
Noklikšķiniet uz Finish, lai saglabātu šo rezervējamo grafiku.
Kad tas būs izveidots, jums tiks nodrošināta saite uz šo rezervēšanas kalendāru, lai to varētu kopīgot ar citiem. - (Neobligāti) Zem rezervācijas saites atzīmējiet izvēles rūtiņu Generate single-use link, lai izveidotu vienreiz lietojamu saiti. Atlasot šo vienreiz lietojamo saiti, tās derīguma termiņš beigsies pēc tam, kad apmeklētājs rezervēs pasākumu, izmantojot šo saiti. Neizmantotās saites tiks rādītas kā neapstiprinātas cilnē Booked Schedules.
| | Click Finish to save this bookable schedule.
When created, you will be provided with the link to this booking calendar, so that it can be shared with others. - (Optional) Under the booking link, select the Generate single-use link checkbox. When selected, this single-use link will expire after an attendee books an event using this link. Unused links will appear as pending in your Booked Schedules tab.
|


